Have you ever tried to match photos with a GPS track log and ended up with pictures placed miles away from where they were taken. If your photos don’t line up with your GPS track log, or show up in the wrong place on the map, the camera clock is almost always the reason.
You might have been standing at a scenic overlook… but your photos show up a few steps or streets away—or even in the wrong city entirely. That’s not a GPS problem. It’s a camera time problem.
HoudahGeo matches photos to locations by comparing photo timestamps with GPS track logs. If those timestamps are even slightly off, the resulting locations will be too.
The Camera Setup window in HoudahGeo 7 exists for one reason: helping HoudahGeo understand how your camera recorded time. Once that’s clear, HoudahGeo can accurately match your photos to GPS track points and place them on the map exactly where they belong.
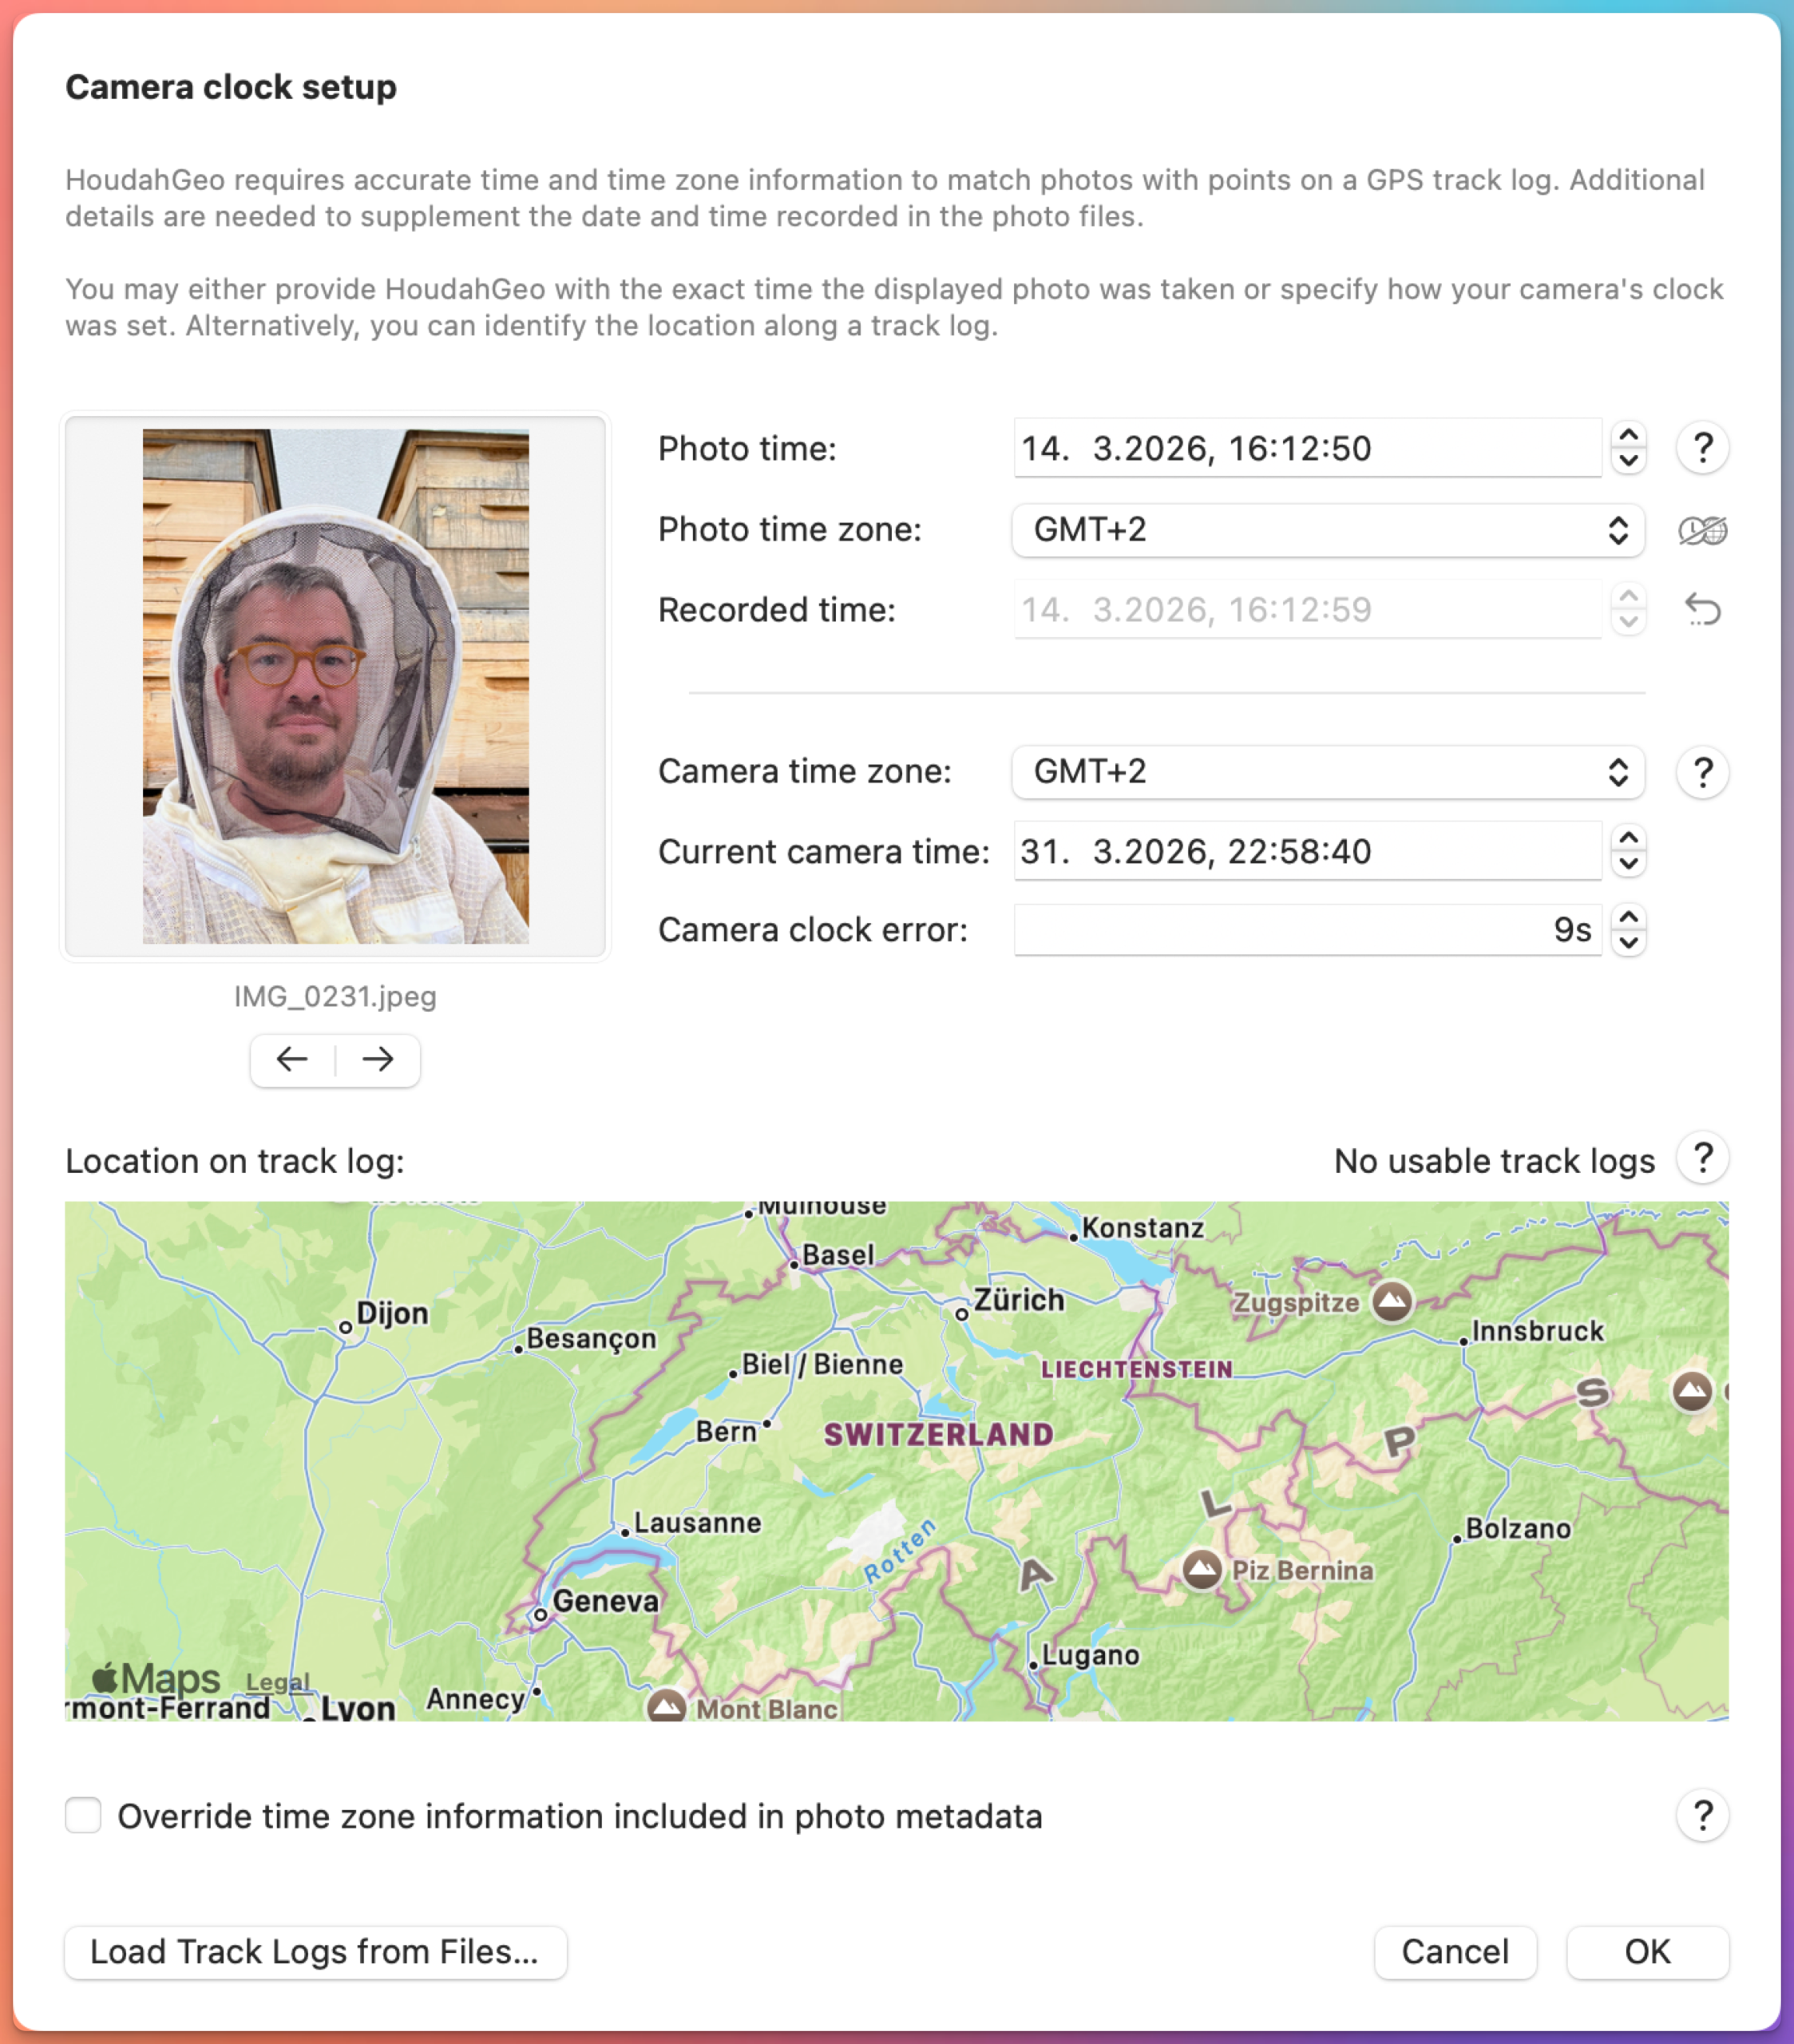
At first glance the window might look technical. In reality, it’s solving a very practical problem most photographers run into sooner or later — usually right after their first trip where they forgot to update the camera clock.
Here’s how each part works, and a few tips to make it go smoothly.
How Camera Time Affects Matching Photos to GPS Track Logs
Most digital cameras record date and time in photo metadata. What they often don’t record is the time zone.
That missing piece matters more than you might expect.
If your camera says a photo was taken at 6:00 PM, HoudahGeo still needs to know where on Earth that time applies.
- 6:00 PM in New York
- 6:00 PM in Los Angeles
Those two times are three hours apart. When matching photos against GPS track logs, even a few seconds can shift the location noticeably. A three-hour difference would put your photo hundreds or thousands of miles away.
The Camera Setup window simply fills in the missing context so HoudahGeo can interpret your camera timestamps correctly.
What the Camera Setup Window Actually Does
Think of Camera Setup as a translator. Your camera records time in its own little world. HoudahGeo needs to translate that into real-world time.
HoudahGeo gives you three ways to define your camera clock. You only need to use one — but all three are visible at once, so you can cross-check the results. If the photo time looks right and the location lands where you remember, you’re done.
Method 1: Tell HoudahGeo When a Photo Was Taken
This is the most intuitive method for many people.
You simply pick a photo and tell HoudahGeo the exact time it was taken.
The ideal candidate is a photo of something that clearly shows the time:
- your phone lock screen
- a GPS device
- a watch or clock
- even a screenshot of a time app
Once you enter the correct date, time, and time zone, HoudahGeo calculates:
- the camera’s time zone – how your camera clock was set up
- how fast or slow the camera clock was running
From there it can correct the timestamps of the entire photo set.
Practical Tip
Get in the habit of photographing your phone screen or watch when setting up your camera. This creates a perfect reference photo at the start of a trip and makes geotagging later almost effortless.
Method 2: Tell HoudahGeo How Your Camera Clock Was Set
This method tends to feel more natural for photographers who remember how they configured their camera.
For example:
- Camera set to home time zone
- Camera set to destination time zone
- Camera clock 30 seconds fast
- Camera clock 2 minutes slow
You simply enter the camera time zone (the time zone you intended to set your camera to) and then adjust the clock error (how far ahead or behind the camera clock was). Alternatively, you can provide the current camera time (the date and time as seen on your camera display right now).
HoudahGeo then computes the actual photo time.
Why the camera clock keeps running
One detail sometimes confuses users: The camera time display in HoudahGeo keeps ticking forward — just like a real clock. If you haven’t touched your camera clock since the trip, the time shown should match what your camera displays right now. That’s the point: it’s a live confidence check, not a decorative detail.
What it’s trying to show you
If you haven’t changed your camera clock since taking the photos, the time shown here should match what your camera would display right now. If it matches, your settings are correct. If it doesn’t, something is off — or you may simply have adjusted the clock on your camera since then.
Why values seem to “change” while editing
While you edit the camera time, HoudahGeo temporarily pauses the clock so you can enter numbers. Once confirmed, it resumes — just like your camera clock would. In the meantime, the frozen camera time drifts from the wall time, so the clock error value keeps updating to reflect that drift. And since the drift affects how photo times are calculated, the photo time display starts running too.
When to Ignore the Running Clock
There’s one important exception.
If you changed your camera clock after taking the photos, the live display won’t match anymore.
In that case, ignore the running clock and rely on Method 1 (photo time) or Method 3 (position on track log).
Practical tip
If you’re unsure whether your settings are correct:
- check the computed photo time
- check the location on the map (if using a track log)
If both match your memory, you’re good—regardless of what the running clock shows.
Method 3: Match a Photo to a Spot on the Track Log
Sometimes you don’t know the exact time, but you remember where you were.
In that case, you can load your GPS track log and click the spot where you took the photo.
HoudahGeo will determine:
- when you were at that location
- what the photo time must have been
This method is slightly less precise. If you lingered at that location for a while, HoudahGeo can’t know whether the photo was taken immediately or a few minutes later.
Still, it’s extremely helpful when reconstructing timelines from memory.
A Helpful Way to Think About the Interface
One thing that makes the Camera Setup window powerful is that all three methods are visible at the same time.
You might:
- set the camera time zone and clock error
- check that the photo time now looks correct
- verify that the location on the map matches your memory
It’s a small diagnostic dashboard for your camera clock.
A Simple Rule: Time Shifts Alone Aren’t Enough
A common mistake is trying to fix timestamps using only a time shift.
But HoudahGeo always needs a time zone reference.
For example, instead of saying:
“My camera was 3 hours and 15 minutes ahead.”
You would say:
- Camera time zone: GMT
- Clock error: +3h 15m
That tells HoudahGeo exactly how to interpret the timestamps.
Mixing Cameras and Smartphones
Many projects include photos from multiple devices.
That’s perfectly fine – as long as only one set of photos lacks time zone.
For example:
- DSLR photos without time zone info
- iPhone photos with full timestamp metadata
By default, HoudahGeo trusts photos that already contain time zone information. It only applies camera clock corrections to photos that need them.
This makes smartphone images great reference points when aligning camera photos. HoudahGeo can geocode using the reference photos: copy locations from the iPhone photos to the DSLR photos taken at around the same time.
Practical Tip
You can mix photos from two cameras with different clock settings, by adding accurate timestamps including time zone information to all or all but one set of photos.
Think of it as synchronizing camera clocks: you add the “where” time zone component to all camera times and at the same time apply individual clock error corrections.
Import photos from a single camera into a HoudahGeo project. Provide accurate clock settings information using the Camera Setup window. Then use Output > Export EXIF/XMP… to write the fully qualified timestamp back to the image and photo files.

Now you can add the photos to a new HoudahGeo project alongside photos from a different camera. By default, the camera clock settings in that project will apply only to photos that lack time zone information.
When to Override Time Zone Metadata
There is an option at the bottom of the window:
Override time zone information included in photo metadata
Normally this is left off.
But it becomes useful if:
- incorrect time zones were written previously
- photos were processed incorrectly by another tool
Turning it on tells HoudahGeo to ignore existing time zone data and apply your camera clock settings everywhere.
A Small Setup Step That Makes Everything Work
The Camera Setup window might seem like a technical detail, but get it wrong and every photo ends up in the wrong place — sometimes by hundreds of miles.
Once the camera clock is understood, HoudahGeo can match photos precisely to GPS tracks, place them correctly on the map, and write accurate timestamps back to the files. Those timestamps carry through to the rest of your workflow too: photo organizers, mapping software, anything that reads EXIF data.
Tip for your next trip:
Take smartphone photos for reference. Even when you do not plan to use reference photo geocoding, these photos will help validate your camera clock settings.
Quick Recap: Getting Camera Time Right
If your photos are not matching your GPS track, the issue is almost always the camera clock.
Here’s what to keep in mind:
- Your camera records date and time, but usually not the time zone
- GPS track logs rely on precise timestamps to determine location
- Even small differences can throw off positioning
- The Camera Setup window lets you fix camera timestamps by adding the missing context
Once HoudahGeo understands how your camera clock was set, everything else falls into place. Matching photos to GPS track logs becomes almost automatic – and your photos end up exactly where you remember taking them.
If you’d like to explore this further, check out the
or read up on details in the